As most of you probably encountered AI/ML problems can be somewhat confusing, so much so that people completely give up on solid ideas just because they don’t know how to proceed with it and build something that works and solves their problem. Well, today I’m gonna try and change that, today I will showcase a really quick way to build a proof-of-concept solution for your object detection problem. I’m going to show you how to build an object detection model using Detectron2 framework, which is probably the best object detection platform up to date.
In this tutorial I will build an object detection model that can recognize vehicle license plates. Just FYI - about a year ago I wrote a similar atricle, where we detected license plates heuristically (using OpenCV image transformations) without any real AI. This time I’m gonna revert to the same basic task at hand - detect license plates on photos. The problem becomes harder though, now all images are from various surroundings, plates are of different formats (European white/yellow, UK yellow/black, USA plates, Russian, Japanese, Chinese, Australian and etc). And this time we’re gonna build a real AI model to solve this!
The license plate detection problem is chosen just as an example, what I really want to demonstrate is how fast we can build an ML solution to object detection problem. Quickly going from rough idea to a pretty accurate model.
Without further adieu - let’s get started!
Part 1 - Preparing the dataset
First and foremost - get your images! Doesn’t matter where they come from, just get your hands on at least 30-40 images for your problem. In this case I’m just gonna use a few images from my recent screenshots, and a few from google searches, and a few from Wiki media… You get the gist of it.
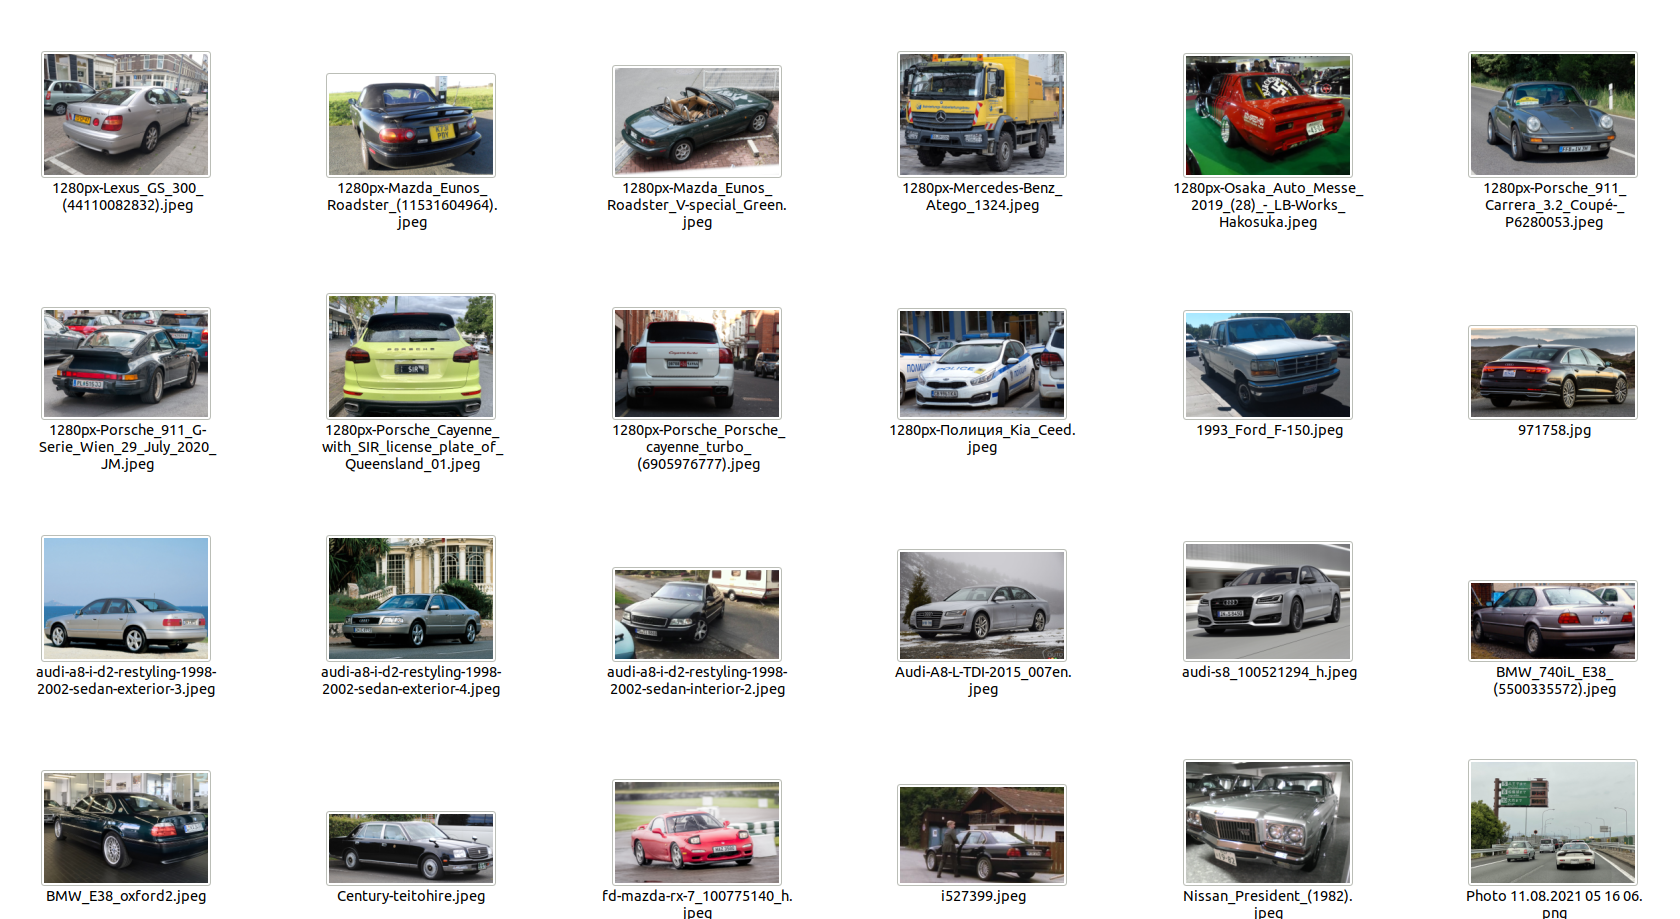
Dataset folder with downloaded images
Don’t rush to get hundreds and thousands of samples (leave it be until you reach closer to production stage), just FYI this demo project was trained on only 63 images. Of course it all depends on the complexity of your problem, but from my rough experience - 30 images will be a good start and 50-100 images will result in a decent proof-of-concept model.
Now with the images ready we can go ahead and start adding annotations to them. You got to remember that there are multiple annotation formats for object detection. There’s COCO, PASCAL VOC, YOLO, CreateML - it’s totally up to you which one of these annotations to use in your dataset. But again from personal experience, and to keep this tutorial as short and as fast as I can - we will use PascalVOC annotation format here.
We will use LabelImg tool to prepare annotations for our dataset. Everything’s pretty straight forward in here, just install LabelImg, fire it up and when in LabelImg open the directory where you dropped your images. We will use only one label plate for this dataset. Make sure PascalVOC format is selected, draw RectBox around the number plate and save your results.
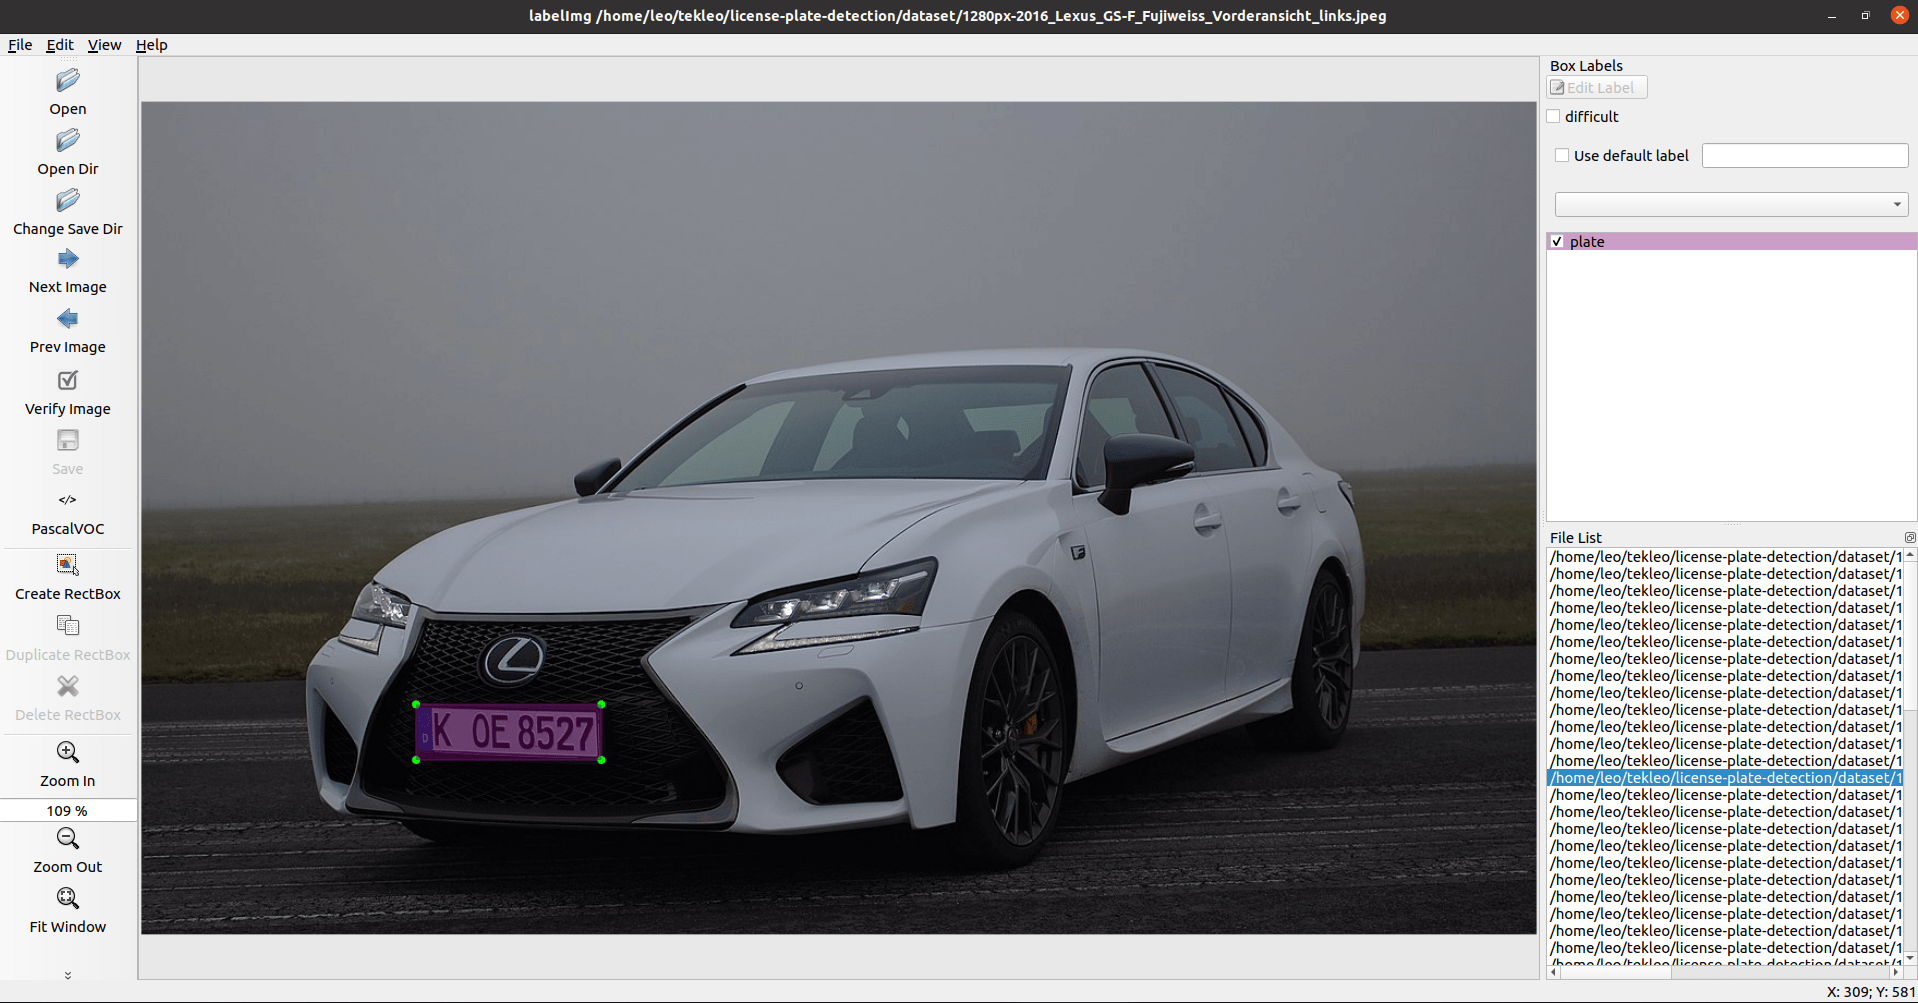
Annotations in LabelImg
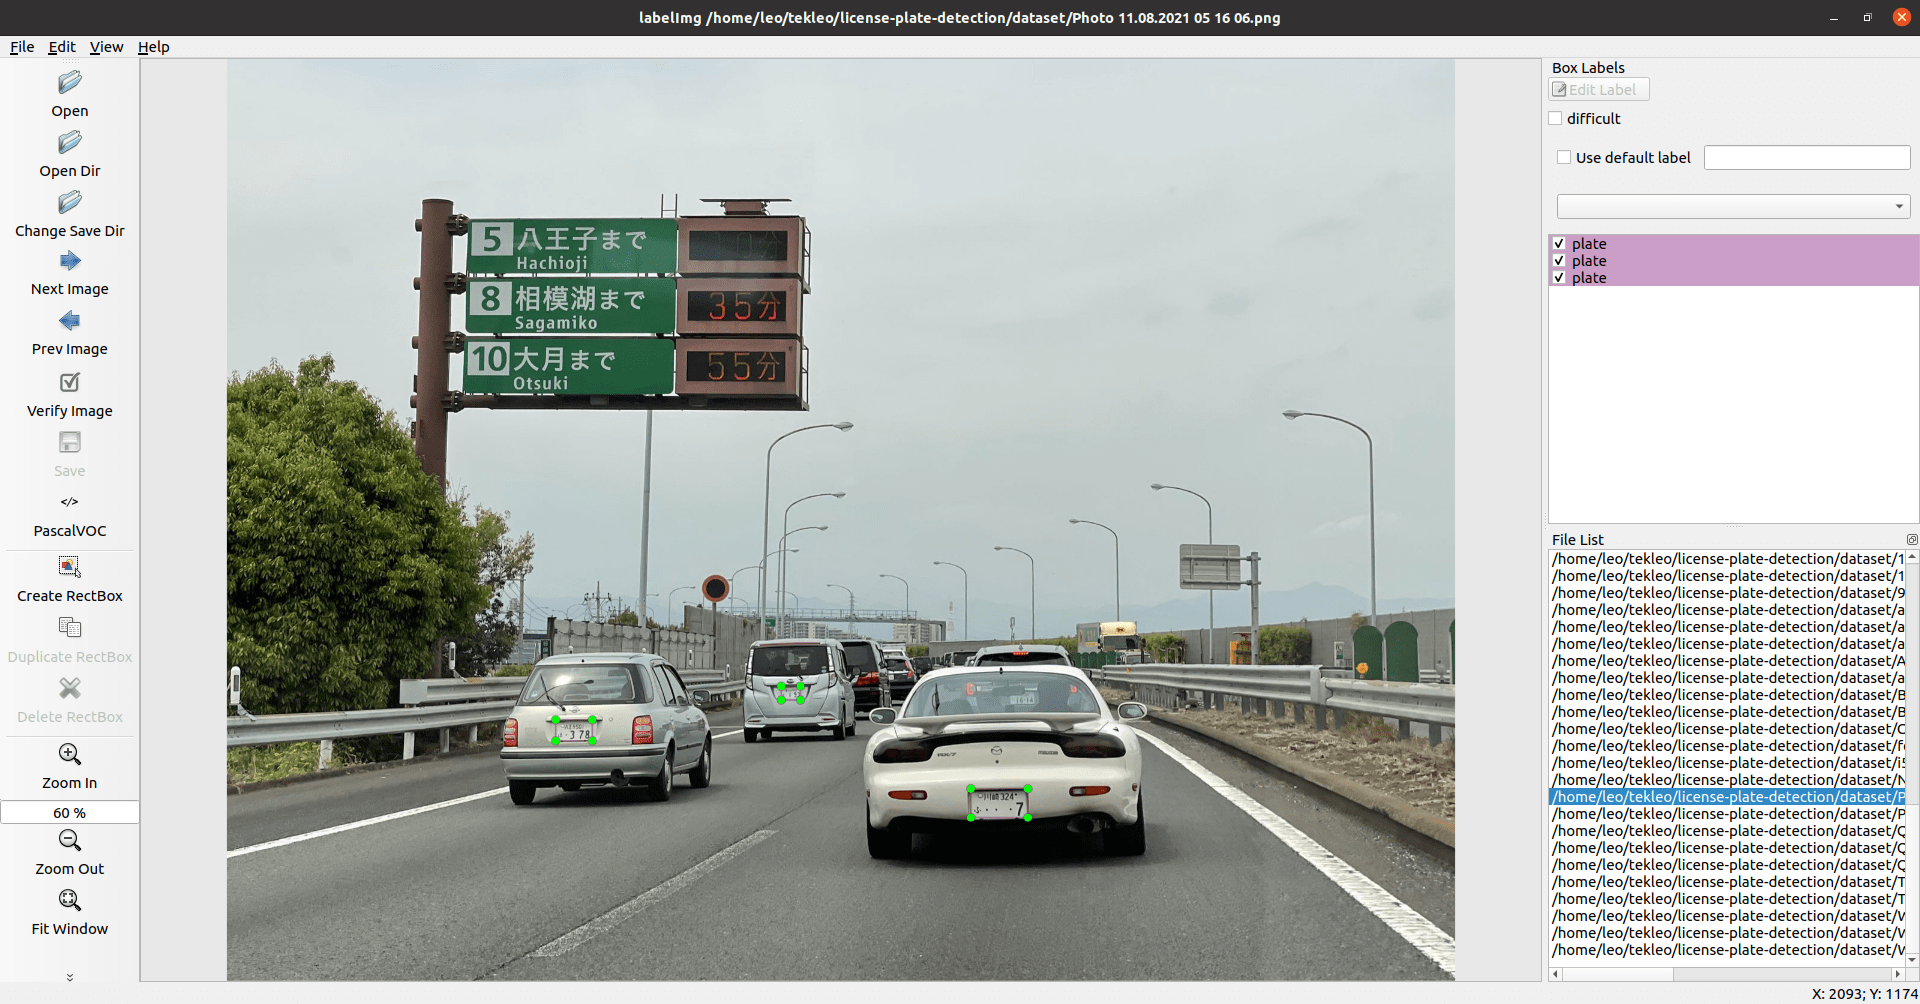
Annotations in LabelImg
Part 2 - Adapter objects
Now to the fun part, we’re gonna need a few common objects for this project. I prefer building them around pydantic models, this way they can be easily integrated into a FastAPI web service when you decide to deploy your model. We’re gonna need to represent a rectangle, a selected region on the image with label, a single dataset sample, and a model’s prediction output. You can check the final version of these objects in helper_objects.py script.
Rectangle
Obviously we want to represent coordinates of our objects both in dataset and in predictions. We’re gonna go with a simple x-y-w-h rectangle for that.
1@gen_str_repr_eq2class Rectangle(BaseModel):3 x: float4 y: float5 w: float6 h: float78 def __init__(self, x: float, y: float, w: float, h: float) -> None:9 super().__init__(x=x, y=y, w=w, h=h)
LabeledBox
In the dataset each object of interest will have its coordinates and a label.
1@gen_str_repr_eq2class LabeledBox(BaseModel):3 label: str4 region: Rectangle # Relative coordinates, from 0.0 to 1.056 def __init__(self, label: str, region: Rectangle) -> None:7 super().__init__(label=label, region=region)
Sample
Single complete dataset sample will consist of an image, a set of labeled boxes and a name.
1@gen_str_repr_eq2class Sample(BaseModel):3 name: str4 image: Image5 boxes: List[LabeledBox]67 class Config:8 arbitrary_types_allowed = True910 def __init__(self, name: str, image: Image, boxes: List[LabeledBox]) -> None:11 super().__init__(name=name, image=image, boxes=boxes)
P.S. class Config is needed to allow usage of PIL Image class in a pydantic model
Prediction
Eventually a single model’s prediction will contain a label, a box and a score.
1@gen_str_repr_eq2class Prediction(BaseModel):3 label: str4 score: float5 region: Rectangle67 def __init__(self, label: str, score: float, region: Rectangle) -> None:8 super().__init__(label=label, score=score, region=region)
Part 3 - Loading the dataset
Our first task will be to load our annotated samples and parse them into our adapter Sample objects. The coding part here is pretty boring, it’s just XML parsing and file scanning, so I won’t comment much about it. You can check the completed final functions in utils_dataset_pascalvoc.py script.
Loading a single sample from provided image path and xml path:
1def load_sample_from_png_and_pascal_voc_xml(image_file_path: str, xml_file_path: str) -> Sample:2 image_pil = open_image_pil(image_file_path)3 xml_file = open(xml_file_path, 'r')4 xml_text = xml_file.read()5 xml_file.close()67 name = [line for line in xml_text.split('\n') if '<filename>' in line][0].replace('<filename>', '').replace('</filename>', '').strip()8 boxes = []910 objects = xml_text.split('<object>')11 objects = objects[1:]12 for object in objects:13 lines = object.split('\n')14 line_name = [line for line in lines if '<name>' in line][0]15 line_xmin = [line for line in lines if '<xmin>' in line][0]16 line_ymin = [line for line in lines if '<ymin>' in line][0]17 line_xmax = [line for line in lines if '<xmax>' in line][0]18 line_ymax = [line for line in lines if '<ymax>' in line][0]1920 label = line_name.replace('<name>', '').replace('</name>', '').strip()21 xmin = int(line_xmin.replace('<xmin>', '').replace('</xmin>', '').strip())22 ymin = int(line_ymin.replace('<ymin>', '').replace('</ymin>', '').strip())23 xmax = int(line_xmax.replace('<xmax>', '').replace('</xmax>', '').strip())24 ymax = int(line_ymax.replace('<ymax>', '').replace('</ymax>', '').strip())2526 x = xmin / image_pil.width27 y = ymin / image_pil.height28 w = (xmax - xmin) / image_pil.width29 h = (ymax - ymin) / image_pil.height3031 region = Rectangle(x, y, w, h)32 box = LabeledBox(label, region)33 boxes.append(box)3435 return Sample(name, image_pil, boxes)
Loading a single sample from provided name and folder path (with support for .png, .jpeg, .jpg image formats, although very rudely executed):
1def load_sample_from_folder(image_and_xml_file_name: str, folder_path: str) -> Sample:2 # Build image file path, trying different image format options3 image_file_path = folder_path + '/' + image_and_xml_file_name + '.png'4 if not os.path.isfile(image_file_path):5 image_file_path = image_file_path.replace('.png', '.jpeg')6 if not os.path.isfile(image_file_path):7 image_file_path = image_file_path.replace('.jpeg', '.jpg')89 # Build XML file path, and show warning if no markup found10 xml_file_path = folder_path + '/' + image_and_xml_file_name + '.xml'11 if not os.path.isfile(xml_file_path):12 print('load_sample_from_folder(): Warning! XML not found, xml_file_path=' + str(xml_file_path))13 return None1415 # Load sample16 return load_sample_from_png_and_pascal_voc_xml(image_file_path, xml_file_path)
And finally loading all images from a folder, with slight multithreading added to speed things up a bit (you’ll notice the performance difference after 200 images):
1def load_samples_from_folder(folder_path: str) -> List[Sample]:2 samples = []34 # Get all files, strip their extensions and resort5 all_files = os.listdir(folder_path)6 all_files = ['.'.join(f.split('.')[:-1]) for f in all_files]7 all_files = set(all_files)8 all_files = sorted(all_files)910 # Load samples in parallel11 executor = concurrent.futures.ThreadPoolExecutor(max_workers=8)12 for sample in executor.map(load_sample_from_folder, all_files, repeat(folder_path)):13 if sample is not None:14 samples.append(sample)1516 # Filter out None values17 samples = [s for s in samples if s is not None]1819 return samples
Part 4 - Conversion to Detectron2 dataset format
After we’ve parsed PascalVOC and loaded our Sample objects in memory we can now convert them to Detectron2’s expected format. You can check the resulting code directly in utils_dataset_detectron.py script.
Building mappings between labels and ids:
1def build_labels_maps(samples: List[Sample]) -> (Dict[str, int], Dict[int, str]):2 labels = []3 for sample in samples:4 for box in sample.boxes:5 if box.label not in labels:6 labels.append(box.label)7 labels = sorted(labels)8 labels_to_id_map = {}9 id_to_labels_map = {}10 for i in range(0, len(labels)):11 labels_to_id_map[labels[i]] = i12 id_to_labels_map[i] = labels[i]13 return labels_to_id_map, id_to_labels_map
Convert from a Sample to Detectron2 Dict:
1def convert_sample_to_detectron_dict(sample: Sample, labels_to_id_map: Dict[str, int], bbox_mode: BoxMode = BoxMode.XYWH_ABS) -> Dict:2 # Generate ID, load image and save it in temp3 id = generate_uuid()4 image_pil = sample.image5 image_path = save_image_pil_in_temp(image_pil, id)67 # Build common8 file_name = image_path # the full path to the image file.9 height = image_pil.height # integer. The shape of the image.10 width = image_pil.width # integer. The shape of the image.11 image_id = id # (str or int): a unique id that identifies this image. Required by many evaluators to identify the images, but a dataset may use it for different purposes.12 annotations = [] # (list[dict]): Required by instance detection/segmentation or keypoint detection tasks. Each dict corresponds to annotations of one instance in this image, and may contain the following keys:1314 # Build boxes15 for box in sample.boxes:16 x = int(box.region.x * width)17 y = int(box.region.y * height)18 w = int(box.region.w * width)19 h = int(box.region.h * height)2021 # Mask polygons22 triangle_1 = [23 x + w / 2, y + h / 2,24 x, y,25 x + w, y26 ]27 triangle_2 = [28 x + w / 2, y + h / 2,29 x + w, y,30 x + w, y + h31 ]32 triangle_3 = [33 x + w / 2, y + h / 2,34 x + w, y + h,35 x, y + h36 ]37 triangle_4 = [38 x + w / 2, y + h / 2,39 x, y + h,40 x, y41 ]4243 bbox = [x, y, w, h] # (list[float], required): list of 4 numbers representing the bounding box of the instance.44 bbox_mode = bbox_mode # (int, required): the format of bbox. It must be a member of structures.BoxMode. Currently supports: BoxMode.XYXY_ABS, BoxMode.XYWH_ABS.45 category_id = labels_to_id_map[box.label] # (int, required): an integer in the range [0, num_categories-1] representing the category label. The value num_categories is reserved to represent the “background” category, if applicable.46 segmentation = [triangle_1, triangle_2, triangle_3, triangle_4]474849 annotation = {50 'bbox': bbox,51 'bbox_mode': bbox_mode,52 'category_id': category_id,53 'segmentation': segmentation54 }5556 annotations.append(annotation)5758 return {59 'file_name': file_name,60 'height': height,61 'width': width,62 'image_id': image_id,63 'annotations': annotations64 }
Now to convert samples in bulk:
1def convert_samples_to_detectron_dicts(samples: List[Sample]) -> List[Dict]:2 labels_to_id_map, id_to_labels_map = build_labels_maps(samples)3 detectron_dicts = []4 for sample in samples:5 d = convert_sample_to_detectron_dict(sample, labels_to_id_map)6 detectron_dicts.append(d)7 return detectron_dicts
Part 5 - Detectron2 model: configuration, training, inference
With dataset converted and all preparations completed we can jump into some shared functions that build Detectron2 models. Again the complete code can be found in utils_model.py. For model configuration we leave the ability to change base model (given that you use another model from Detectron2’s model zoo) and tune prediction score threshold, learning rate, number of training iterations to run and batch size.
Building configuration:
1def build_config(2 model_zoo_config_name: str,3 dataset_name: str, class_labels: List[str],4 trained_model_output_dir: str,5 prediction_score_threshold: float,6 base_lr: float, max_iter: int, batch_size: int7) -> CfgNode:8 trained_model_weights_path = trained_model_output_dir + "/model_final.pth"9 cfg = get_cfg()10 cfg.merge_from_file(model_zoo.get_config_file(model_zoo_config_name))11 cfg.DATASETS.TRAIN = (dataset_name,)12 cfg.DATASETS.TEST = ()13 cfg.OUTPUT_DIR = trained_model_output_dir14 cfg.DATALOADER.NUM_WORKERS = 815 if os.path.exists(trained_model_weights_path):16 cfg.MODEL.WEIGHTS = trained_model_weights_path17 cfg.MODEL.ROI_HEADS.SCORE_THRESH_TEST = prediction_score_threshold18 cfg.SOLVER.IMS_PER_BATCH = 419 cfg.SOLVER.BASE_LR = base_lr20 cfg.SOLVER.MAX_ITER = max_iter21 cfg.SOLVER.STEPS = []22 cfg.MODEL.ROI_HEADS.BATCH_SIZE_PER_IMAGE = batch_size23 cfg.MODEL.ROI_HEADS.NUM_CLASSES = len(class_labels)24 cfg.TEST.DETECTIONS_PER_IMAGE = 10025 return cfg
For training we basically just create a Trainer object with our configuration and run its train() method. You will see a lot of useful debug info in the console - obviously you’ll have output related to current training progress, but it will also show your model’s architecture and your labels distribution in the dataset.
1def run_training(cfg: CfgNode):2 trainer = DefaultTrainer(cfg)3 trainer.resume_or_load(resume=False)4 trainer.train()
When running models in inference mode we first need to create a Predictor object, run an image through this Predictor and convert its outputs to our desired format
1def build_predictor(cfg: CfgNode) -> DefaultPredictor:2 return DefaultPredictor(cfg)34def convert_detectron_outputs_to_predictions(class_labels: List[str], outputs) -> List[Prediction]:5 results = []6 instances = outputs["instances"].to("cpu")7 pred_boxes = instances.pred_boxes8 scores = instances.scores9 pred_classes = instances.pred_classes10 for i in range(0, len(pred_boxes)):11 box = pred_boxes[i].tensor.numpy()[0]12 score = float(scores[i].numpy())13 label_key = int(pred_classes[i].numpy())14 label = class_labels[label_key]1516 x = box[0]17 y = box[1]18 w = box[2] - box[0]19 h = box[3] - box[1]20 region = Rectangle(int(x), int(y), int(w), int(h))2122 prediction = Prediction(label, score, region)23 results.append(prediction)2425 return results2627def run_prediction(cfg: CfgNode, predictor: DefaultPredictor, class_labels: List[str], pil_image: Image, debug: bool = True, save: bool = False):28 # Prep image29 cv_image = convert_pil_to_cv(pil_image)30 image_name = pil_image.filename.replace('dataset_test', '').replace('dataset', '').strip()3132 # Run prediction and time it33 t1 = time.time()34 outputs = predictor(cv_image)35 t2 = time.time()36 d = t2 - t13738 # Debug predictions39 visualize_detectron_outputs(cfg, cv_image, image_name, outputs, debug=debug, save=save)40 predictions = convert_detectron_outputs_to_predictions(class_labels, outputs)41 print('run_prediction(): Testing "' + image_name + '" took ' + str(round(d, 2)) + ' seconds, and resulted in predictions ' + str(predictions))
Part 6 - Training script
After all this preparation work the main training script becomes surprisingly simple, we just load the dataset, convert it to dict, build model config and run training
1# Configuration2dataset_dir = 'dataset'3model_zoo_config_name = 'COCO-InstanceSegmentation/mask_rcnn_R_50_FPN_3x.yaml'4trained_model_output_dir = 'training_output'5dataset_name = 'license-plate-detection-dataset'6class_labels = ["plate"]7prediction_score_threshold = 0.98base_lr = 0.00259max_iter = 100010batch_size = 641112# Build dataset - load samples and filter out the ones with empty boxes13samples = load_samples_from_folder(dataset_dir)14samples = [s for s in samples if len(s.boxes) != 0]1516# Build dataset - convert to detectron format and provide its function and then register it17detectron_dicts = convert_samples_to_detectron_dicts(samples)18def dataset_function():19 return detectron_dicts20register_detectron_dataset(dataset_name, class_labels, dataset_function)2122# Build detectron config & run trainer23cfg = build_config(model_zoo_config_name, dataset_name, class_labels, trained_model_output_dir, prediction_score_threshold, base_lr, max_iter, batch_size)24run_training(cfg)
When the training finishes you’ll have a trained model in model_final.pth file inside your output directory. You can run this training script again and again - it will keep training and improving the model. If the model is already present in the output directory - training resumes from the last state of the model.
I think it’s also worth saying a few words about the hardware used for training - I trained this model on a regular consumer-grade personal gaming PC with one NVIDIA 2070 SUPER (8GB) GPU, Intel Core i5-10600K CPU and 32 GB RAM. Generally speaking any modern NVIDIA GPU with at least 8GB VRAM should be perfectly suitable for training Detectron2 models. I wouldn’t advise you training it on CPU, it’ll be unbearably slow. Allthough running models in inference mode on CPU can be feasable.
Part 7 - Testing script
Everything’s almost identical to the training script, just load the dataset, build config, build Predictor, load test image and run predictor.
1# Configuration2dataset_dir = 'dataset'3dataset_test_dir = 'dataset_test'4model_zoo_config_name = 'COCO-InstanceSegmentation/mask_rcnn_R_50_FPN_3x.yaml'5trained_model_output_dir = 'training_output'6dataset_name = 'license-plate-detection-dataset'7class_labels = ["plate"]8prediction_score_threshold = 0.99base_lr = 010max_iter = 011batch_size = 01213# Build dataset - load samples and filter out the ones with empty boxes14samples = load_samples_from_folder(dataset_dir)15samples = [s for s in samples if len(s.boxes) != 0]1617# Build dataset - convert to detectron format and provide its function and then register it18detectron_dicts = convert_samples_to_detectron_dicts(samples)19def dataset_function():20 return detectron_dicts21register_detectron_dataset(dataset_name, class_labels, dataset_function)2223# Build detectron config & predictor24cfg = build_config(model_zoo_config_name, dataset_name, class_labels, trained_model_output_dir, prediction_score_threshold, base_lr, max_iter, batch_size)25predictor = build_predictor(cfg)2627# Test images from training dataset28image_paths = [29 ...30]3132# Dataset test images33dataset_test_image_paths = os.listdir(dataset_test_dir)34dataset_test_image_paths = sorted(dataset_test_image_paths)35dataset_test_image_paths = [dataset_test_dir + '/' + p for p in dataset_test_image_paths]3637# Merge test & train images38image_paths.extend(dataset_test_image_paths)3940# Run predictions41for image_path in image_paths:42 image_pil = open_image_pil(image_path)43 run_prediction(cfg, predictor, class_labels, image_pil, debug=False, save=True)
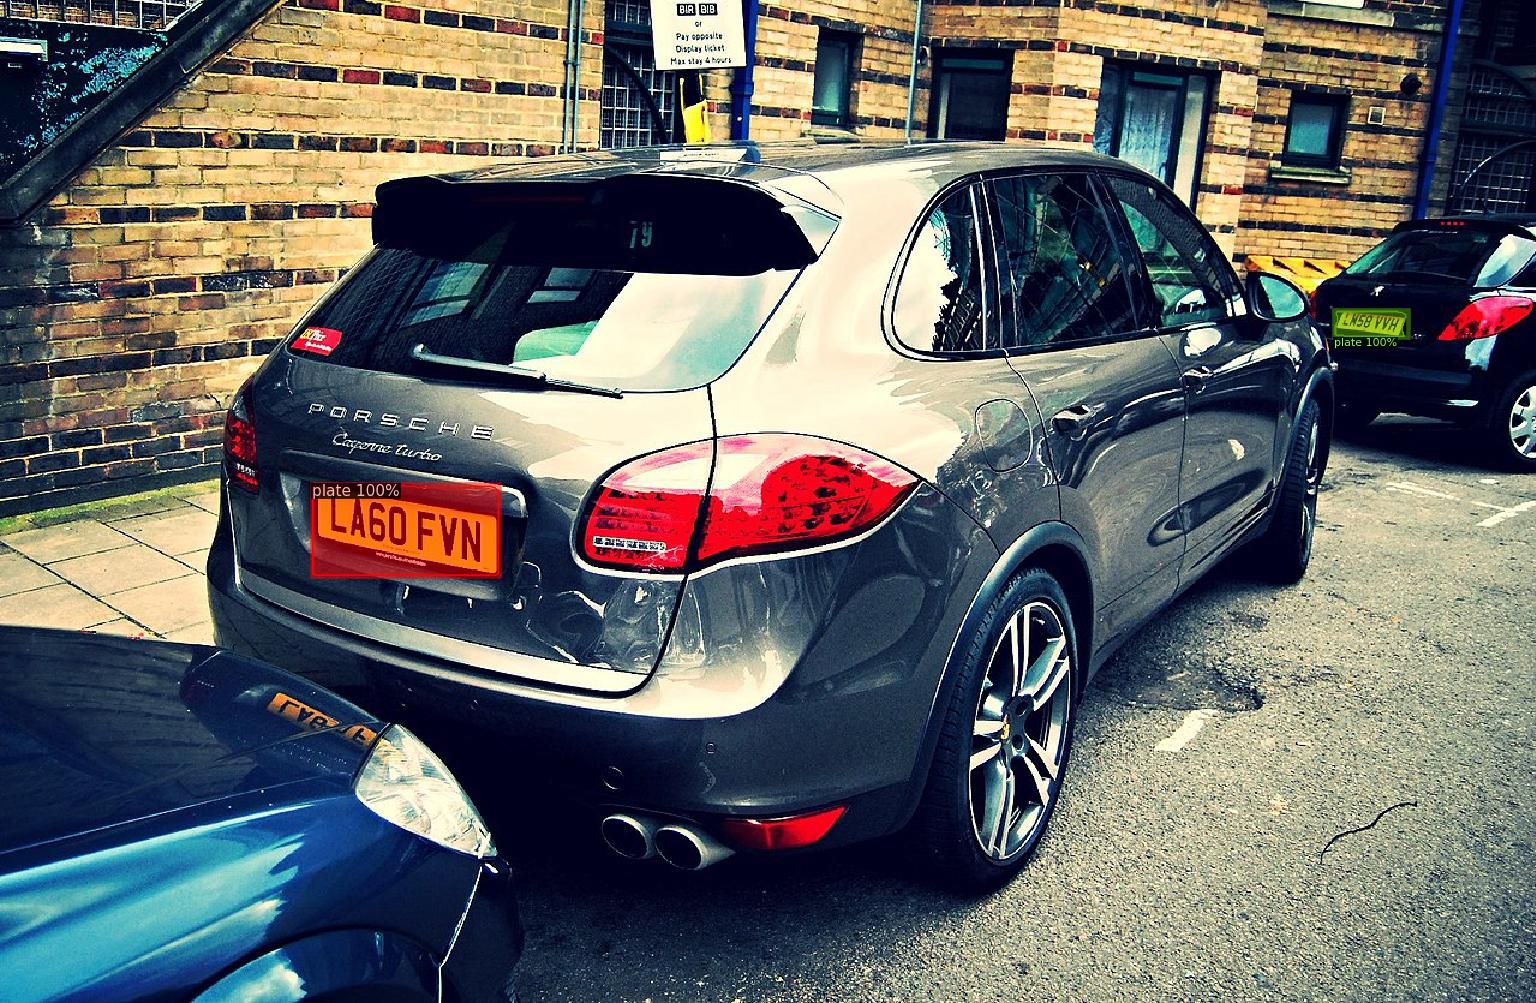
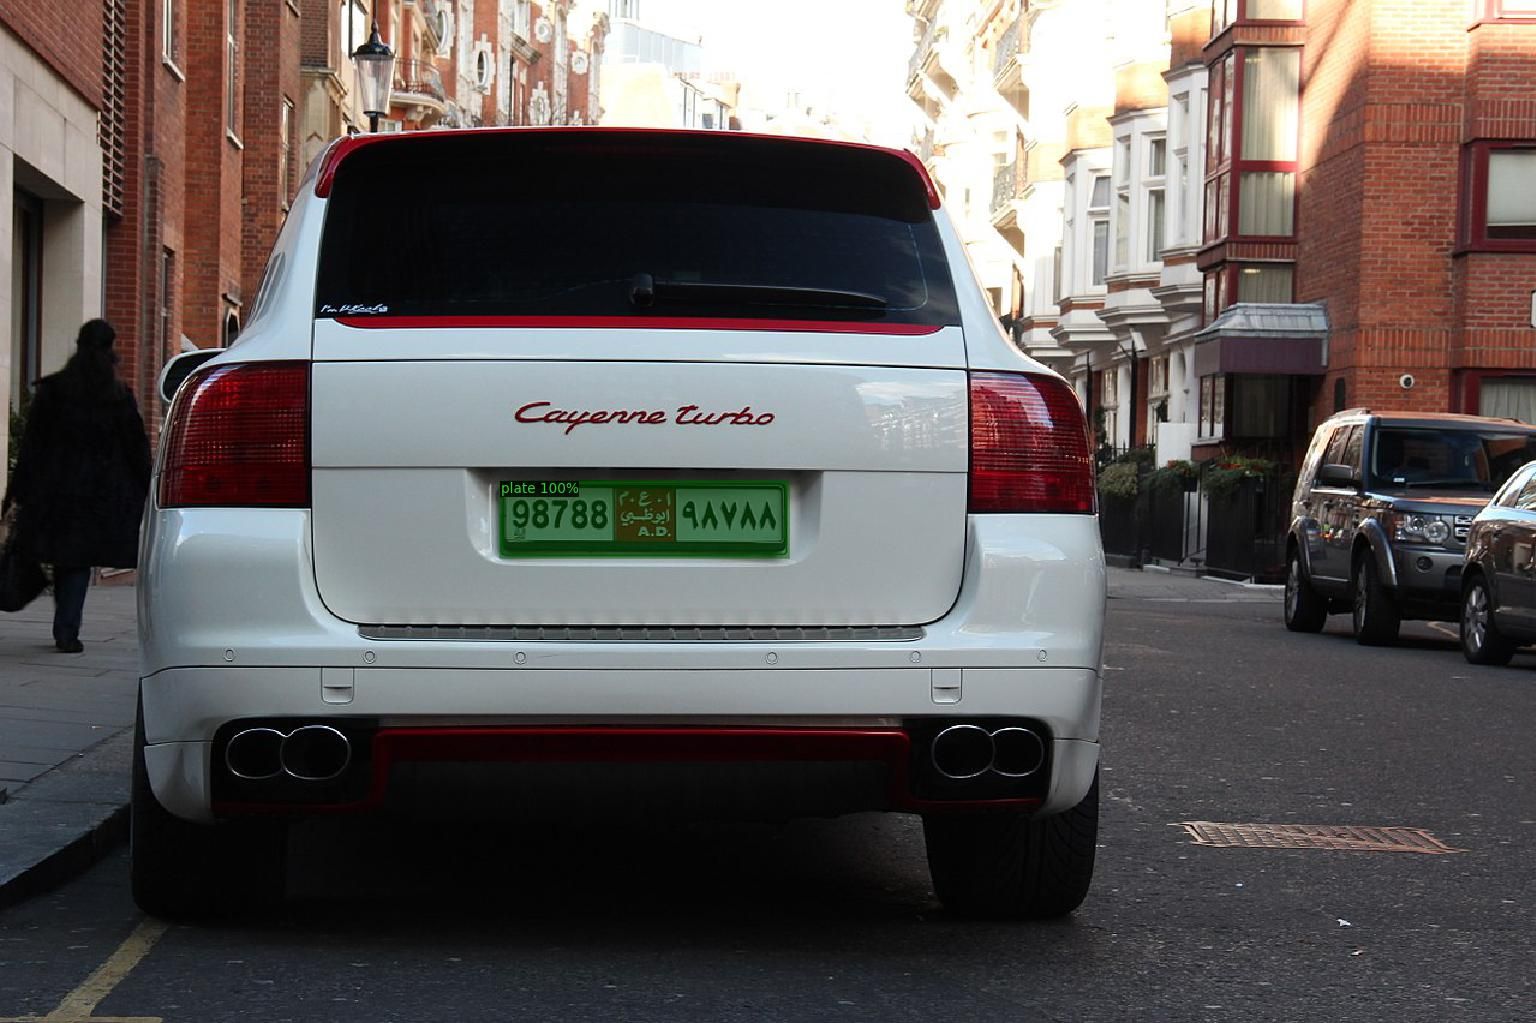
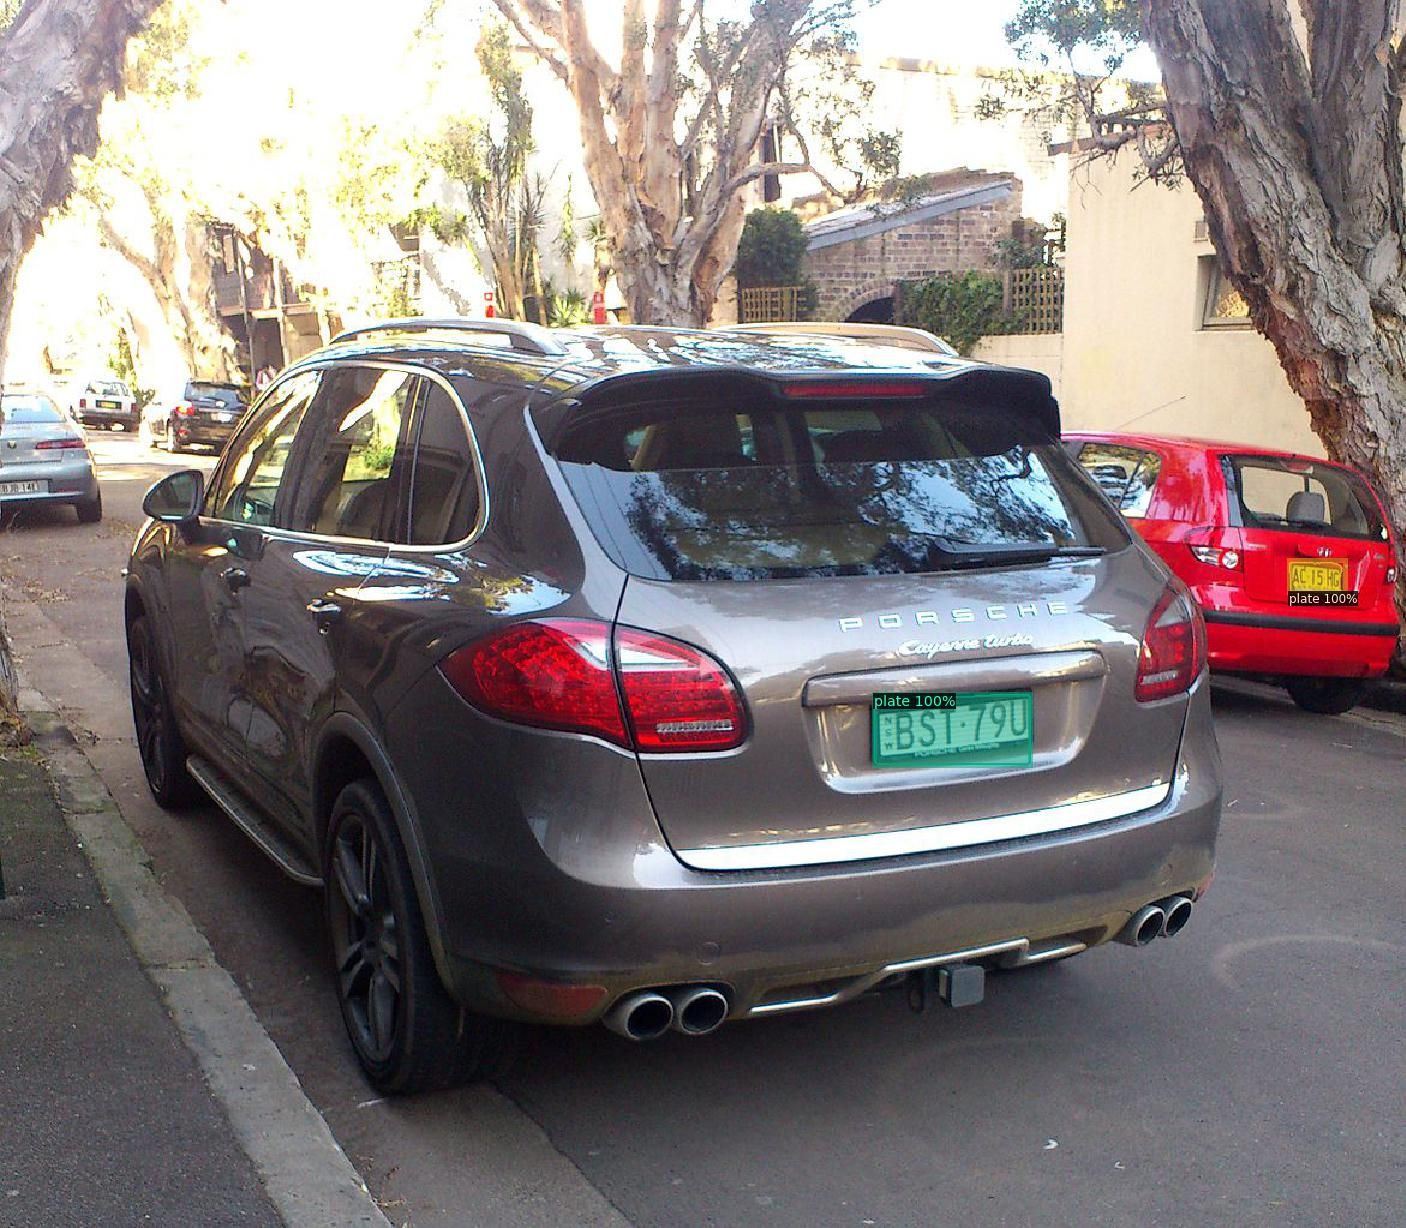
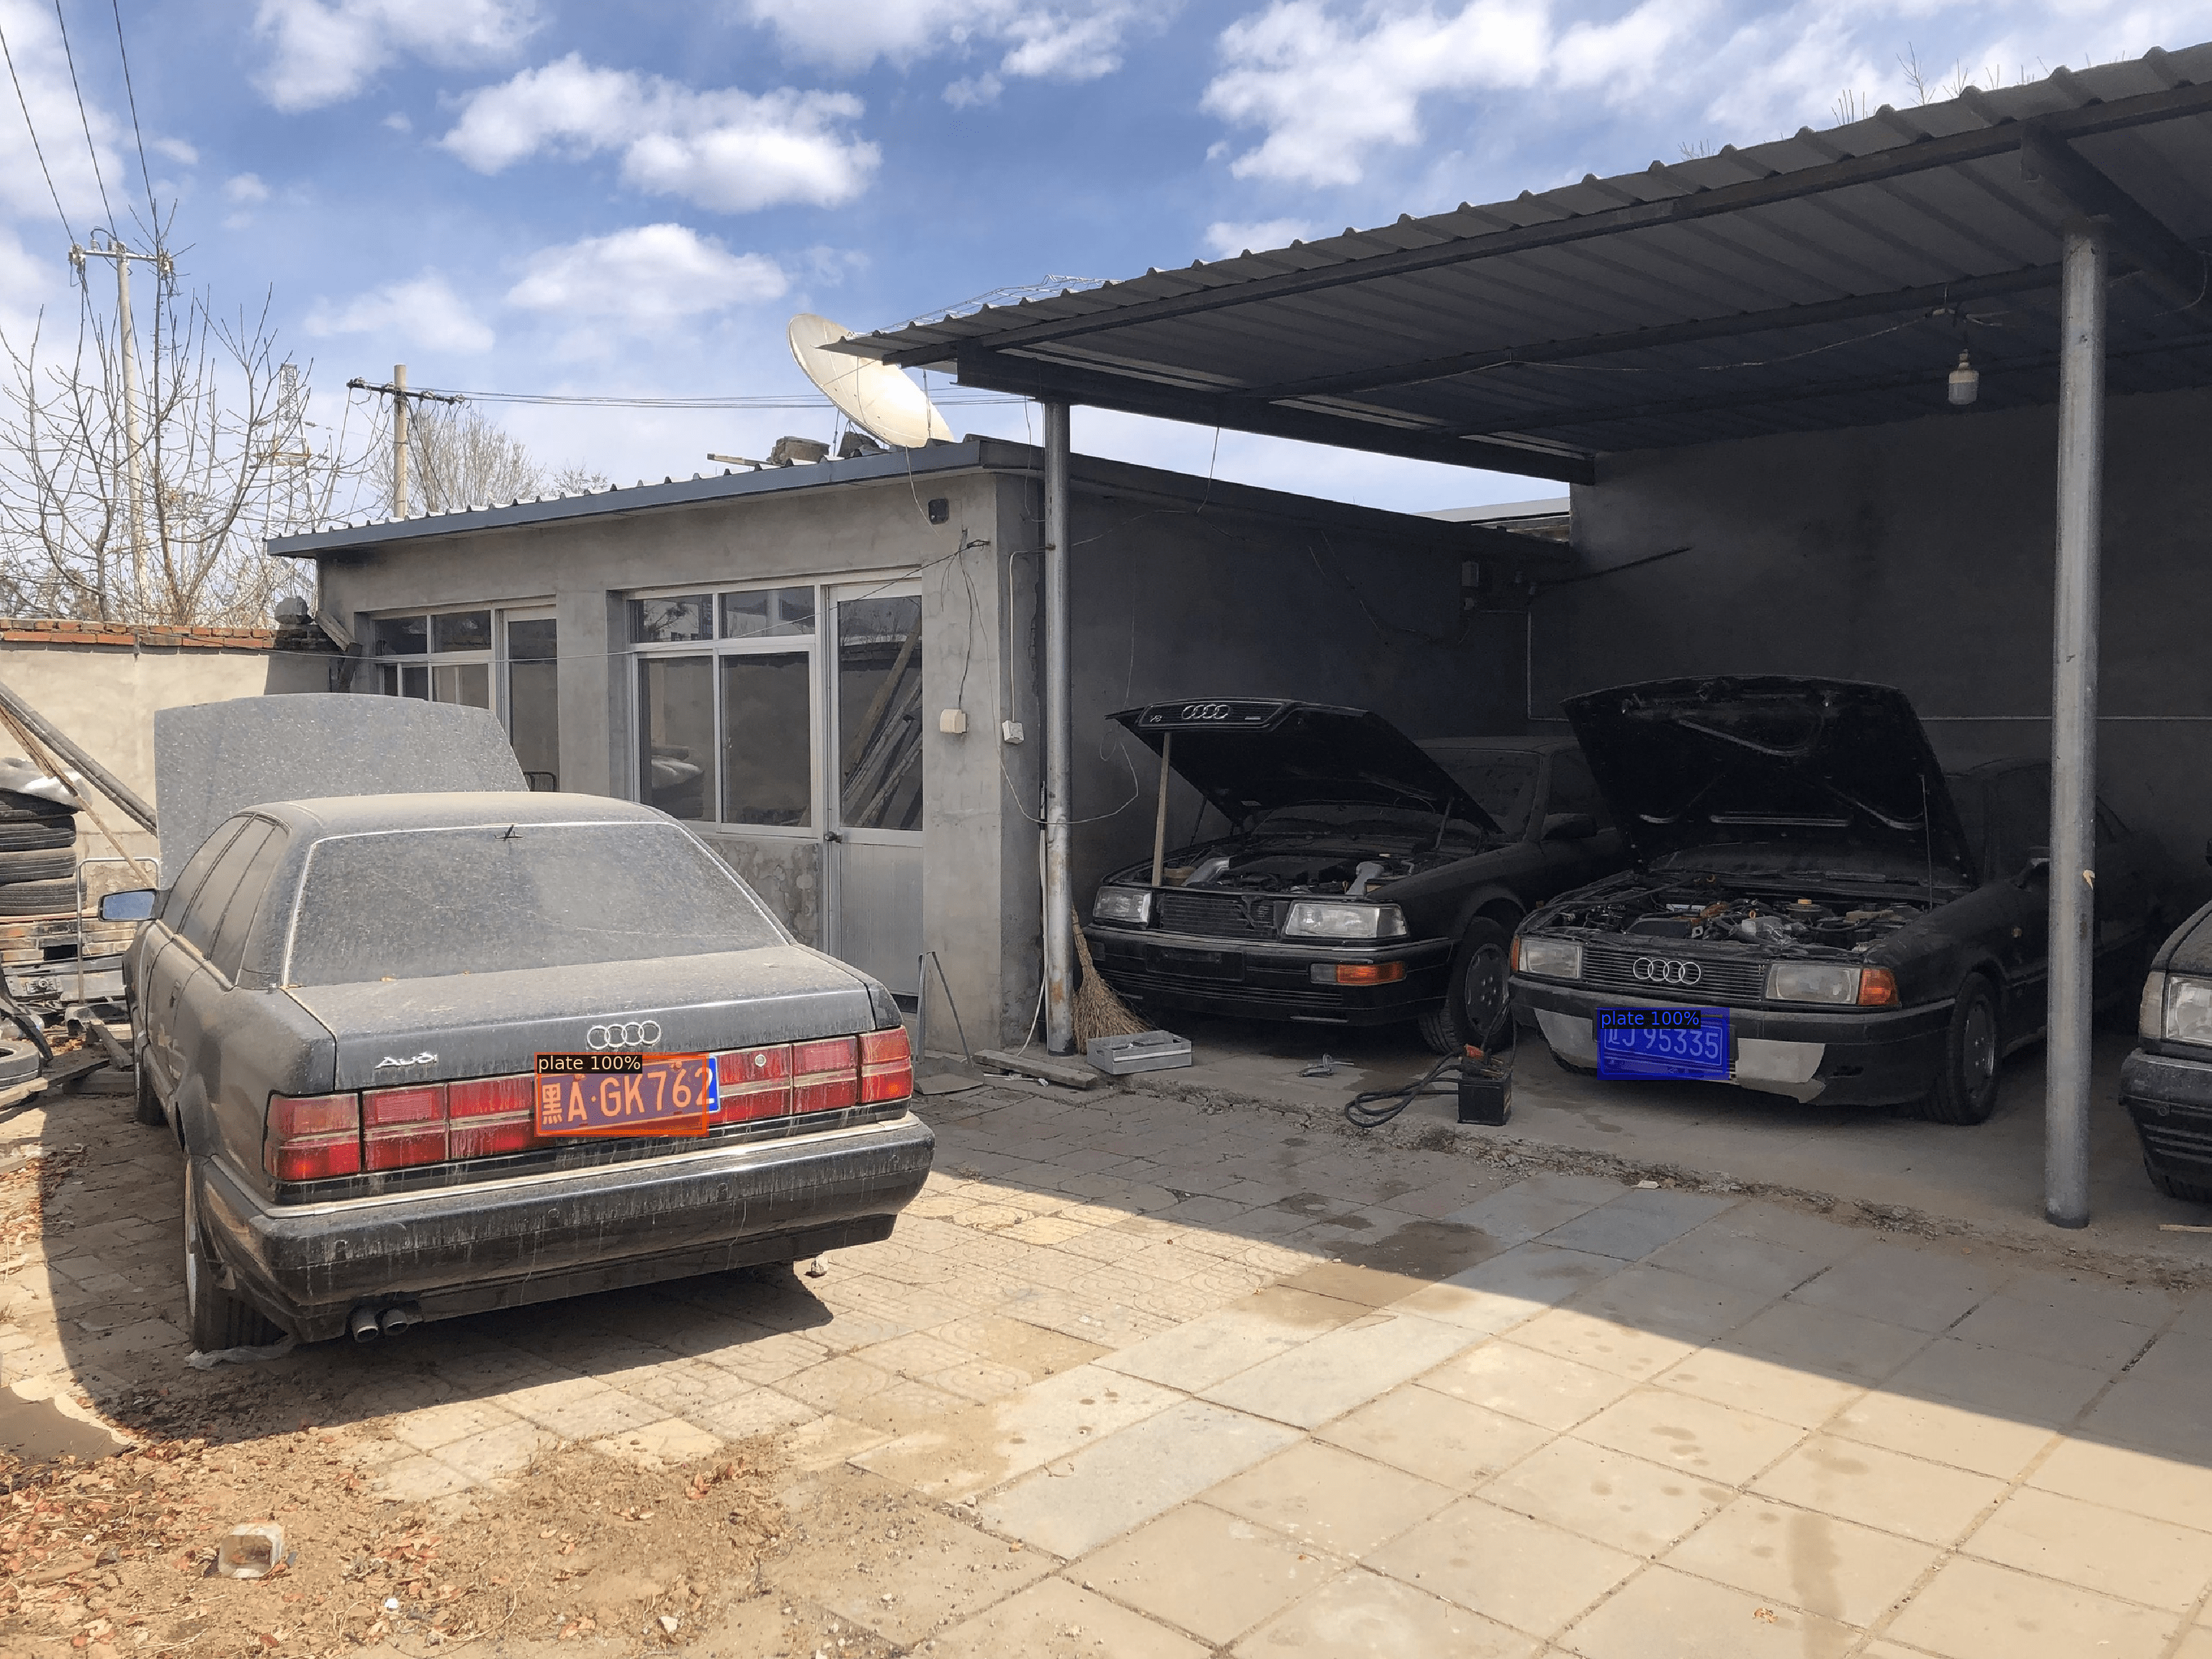
To finish this off here are a few more examples of predictions on images from testing set, this turned out to be better than expected, especially given the small dataset size.
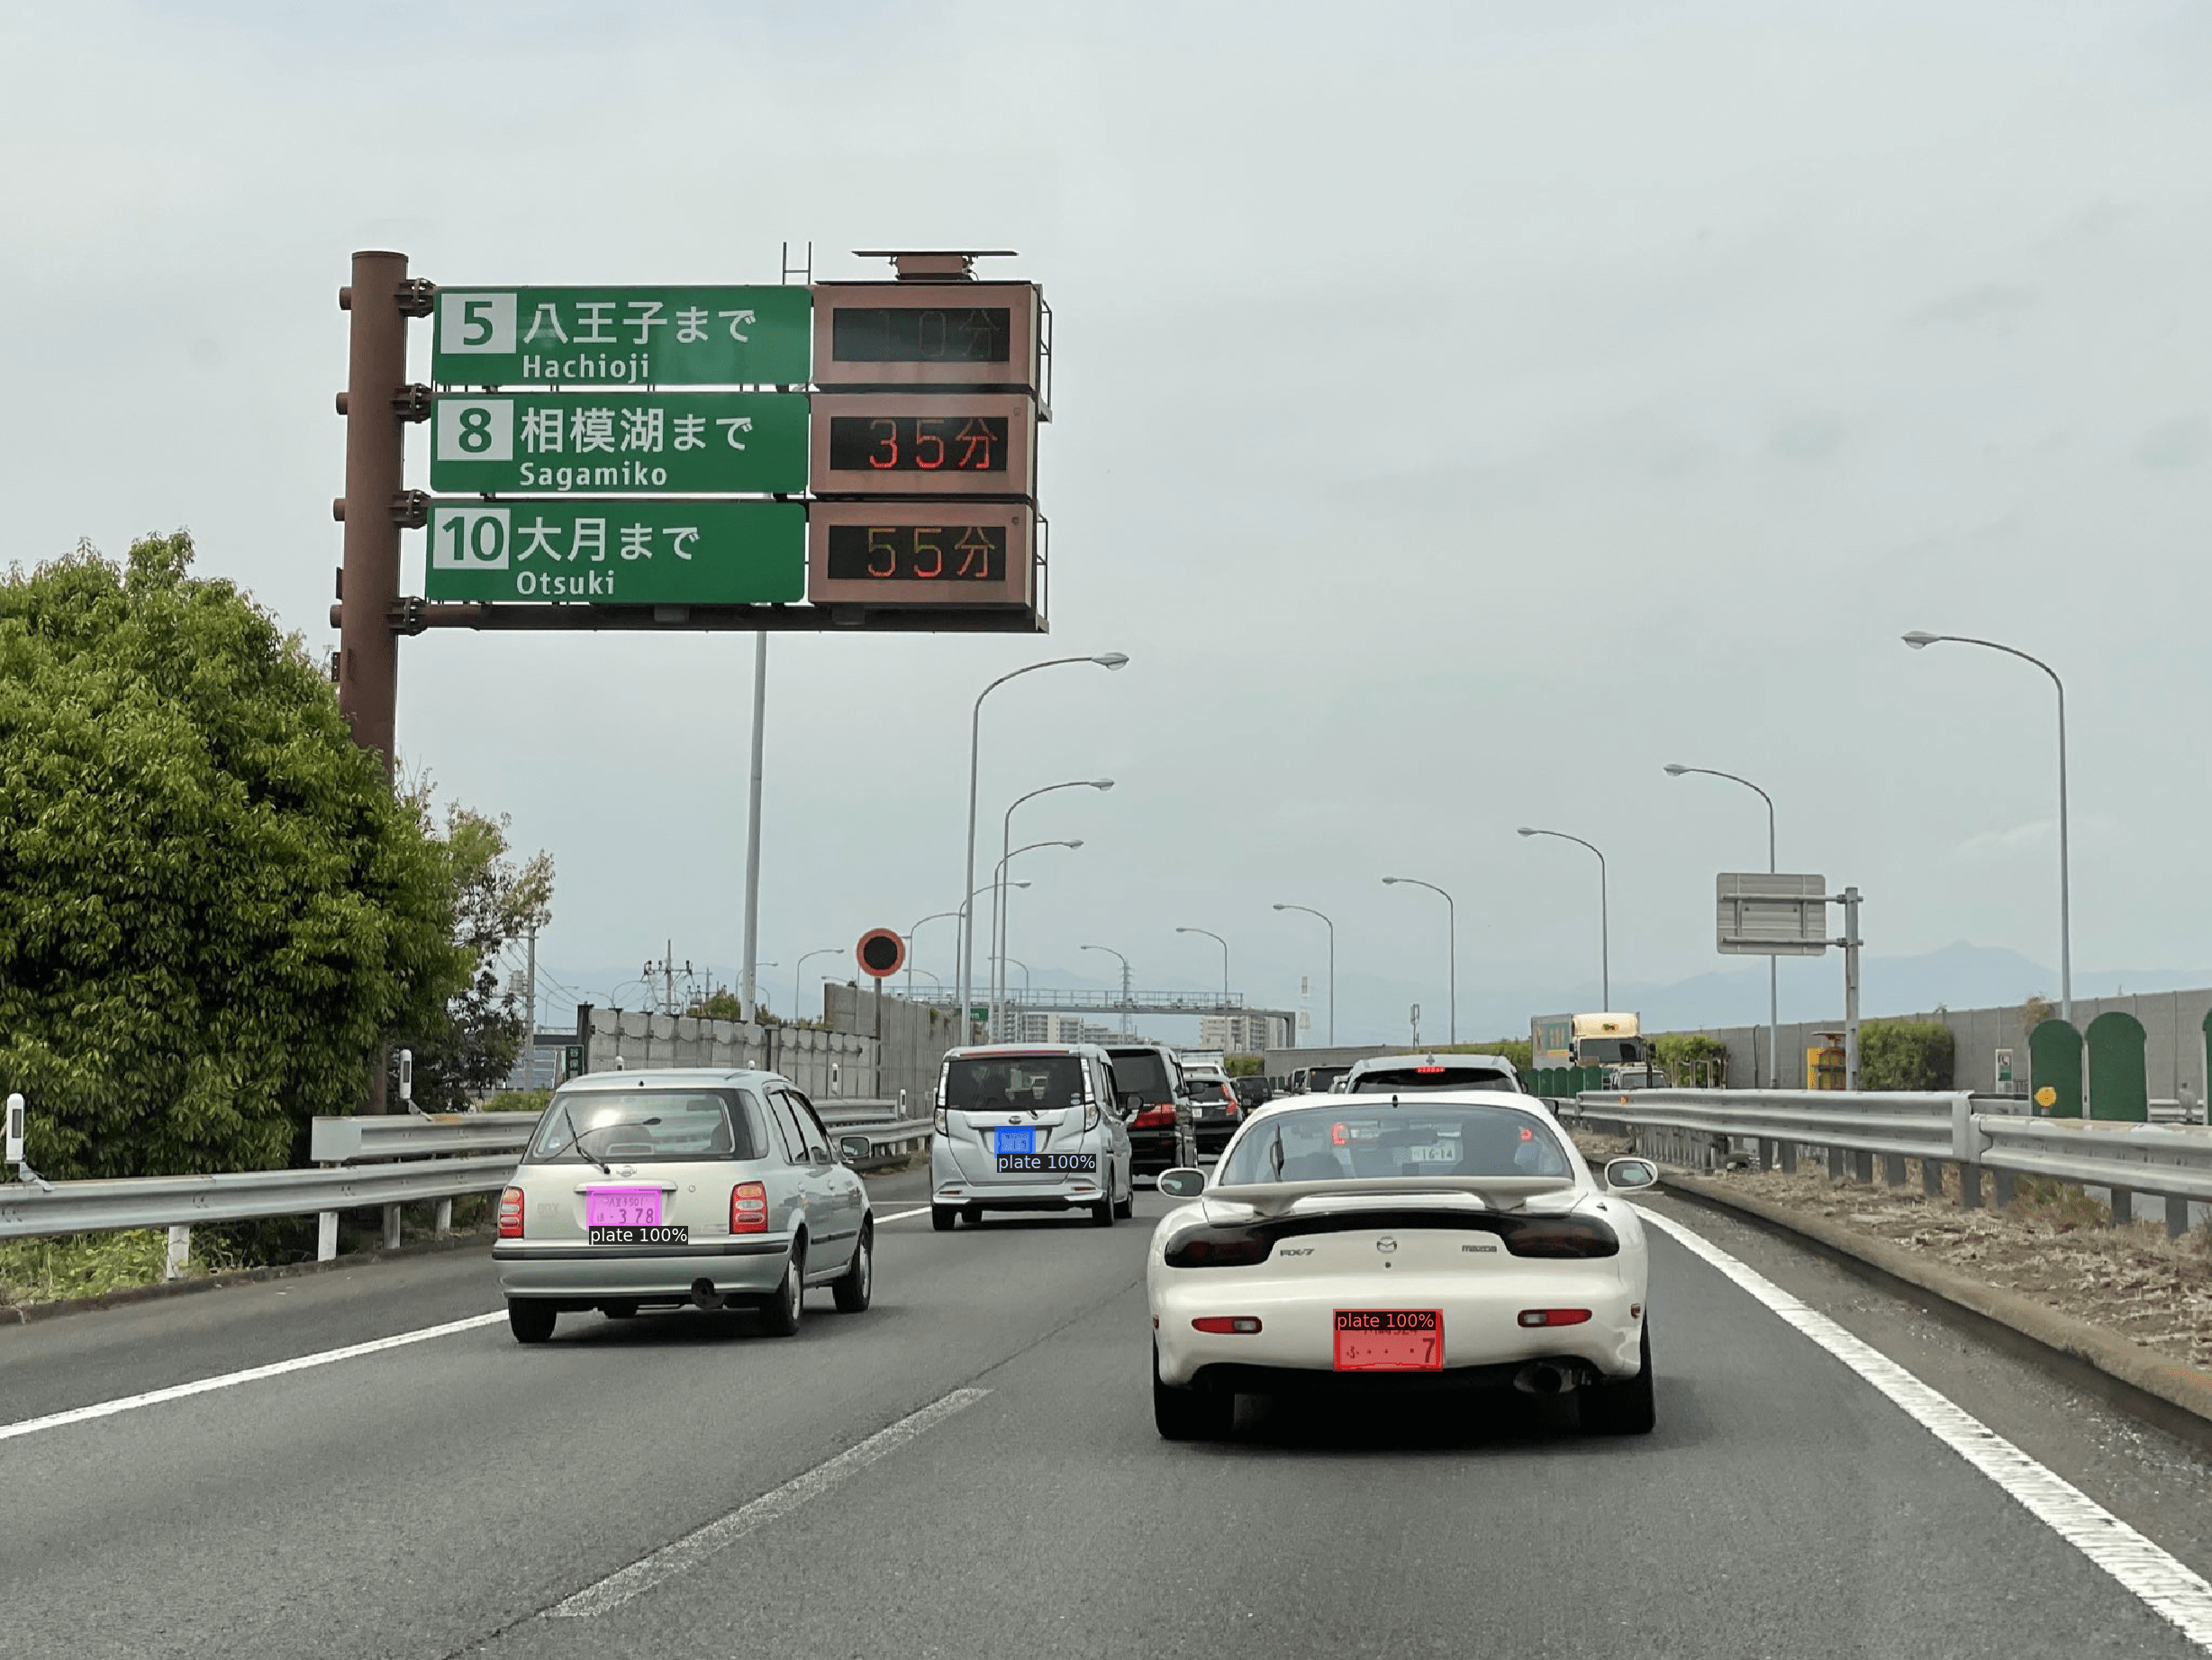
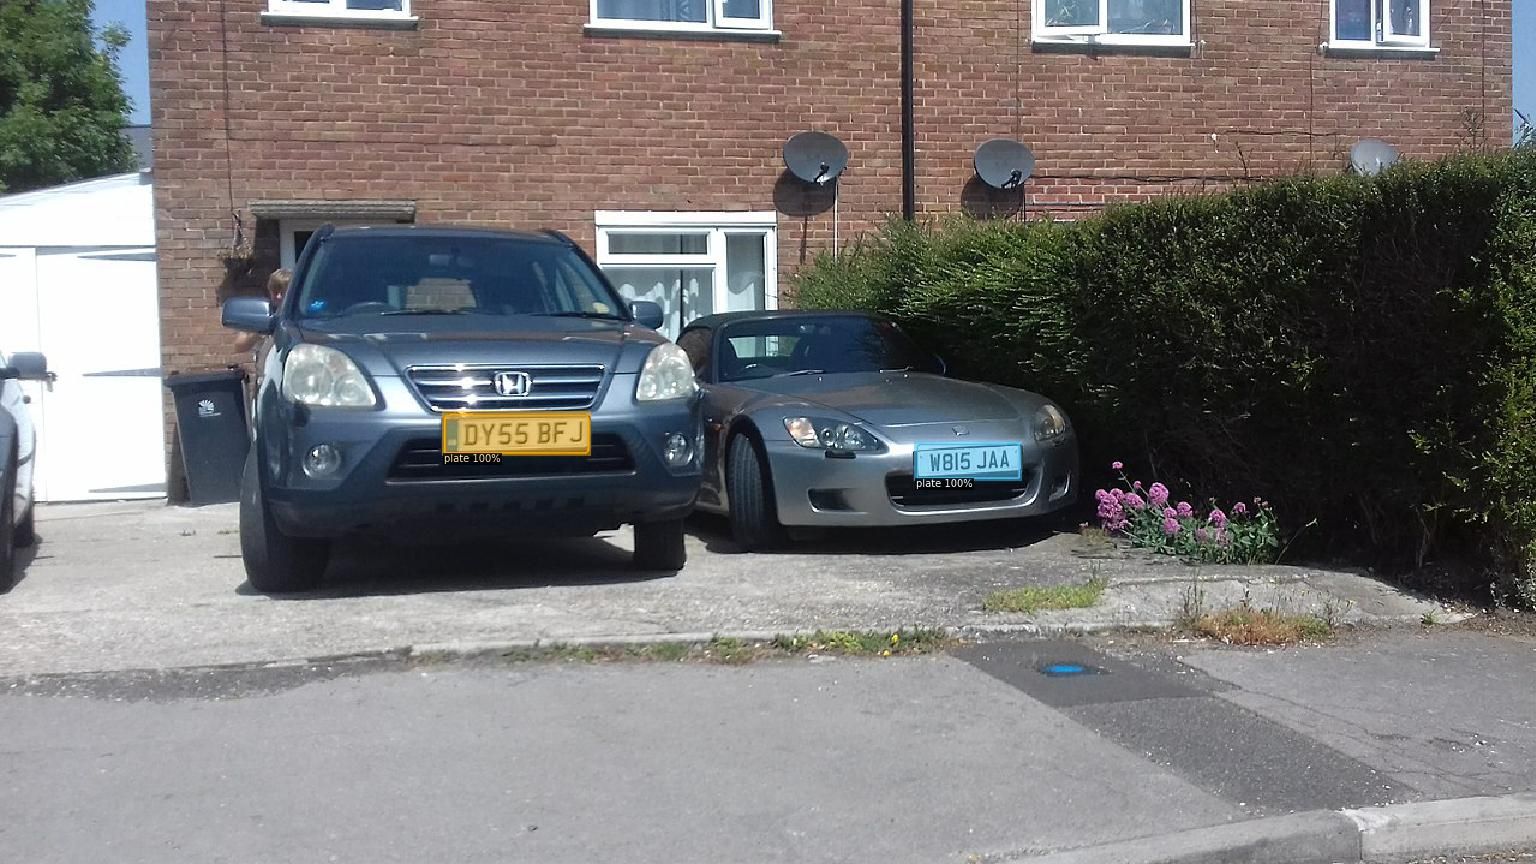
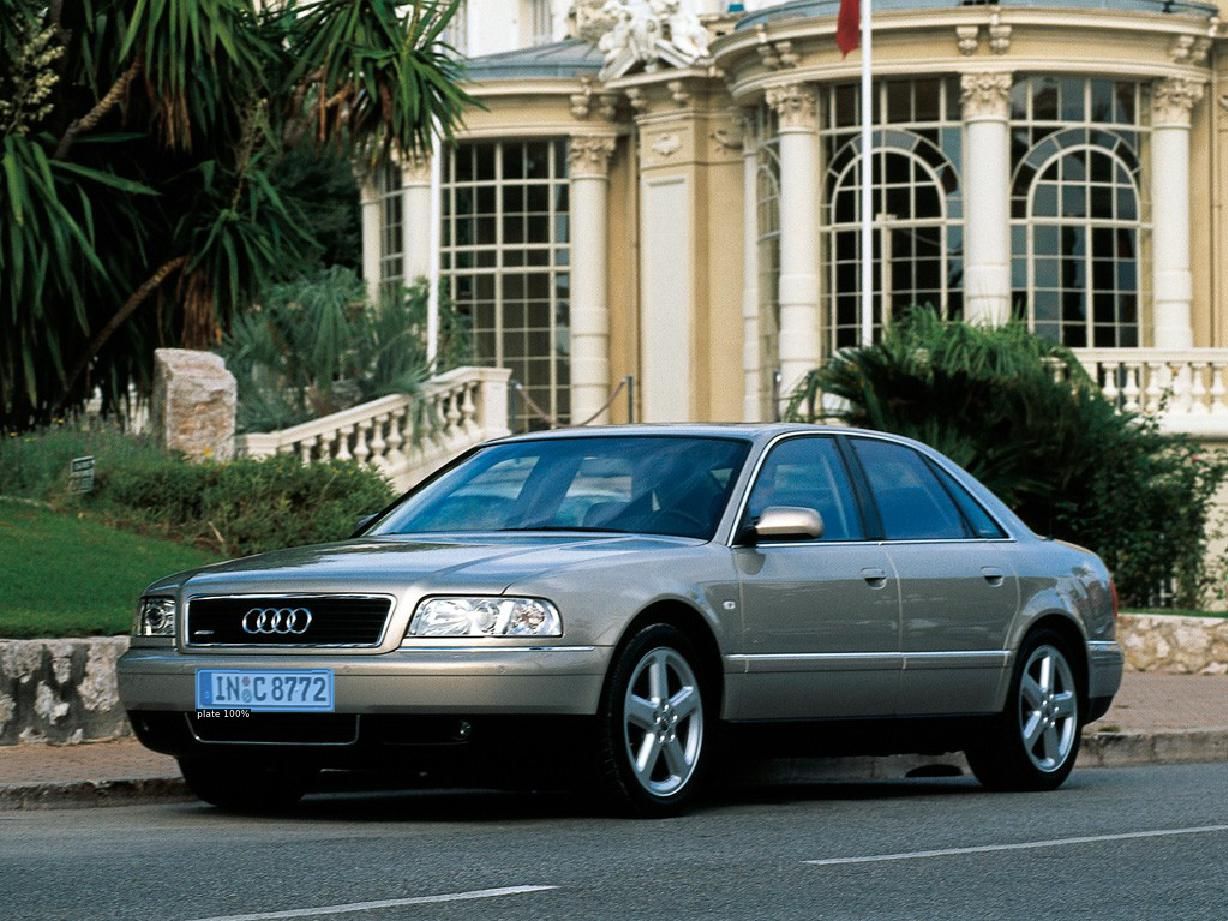
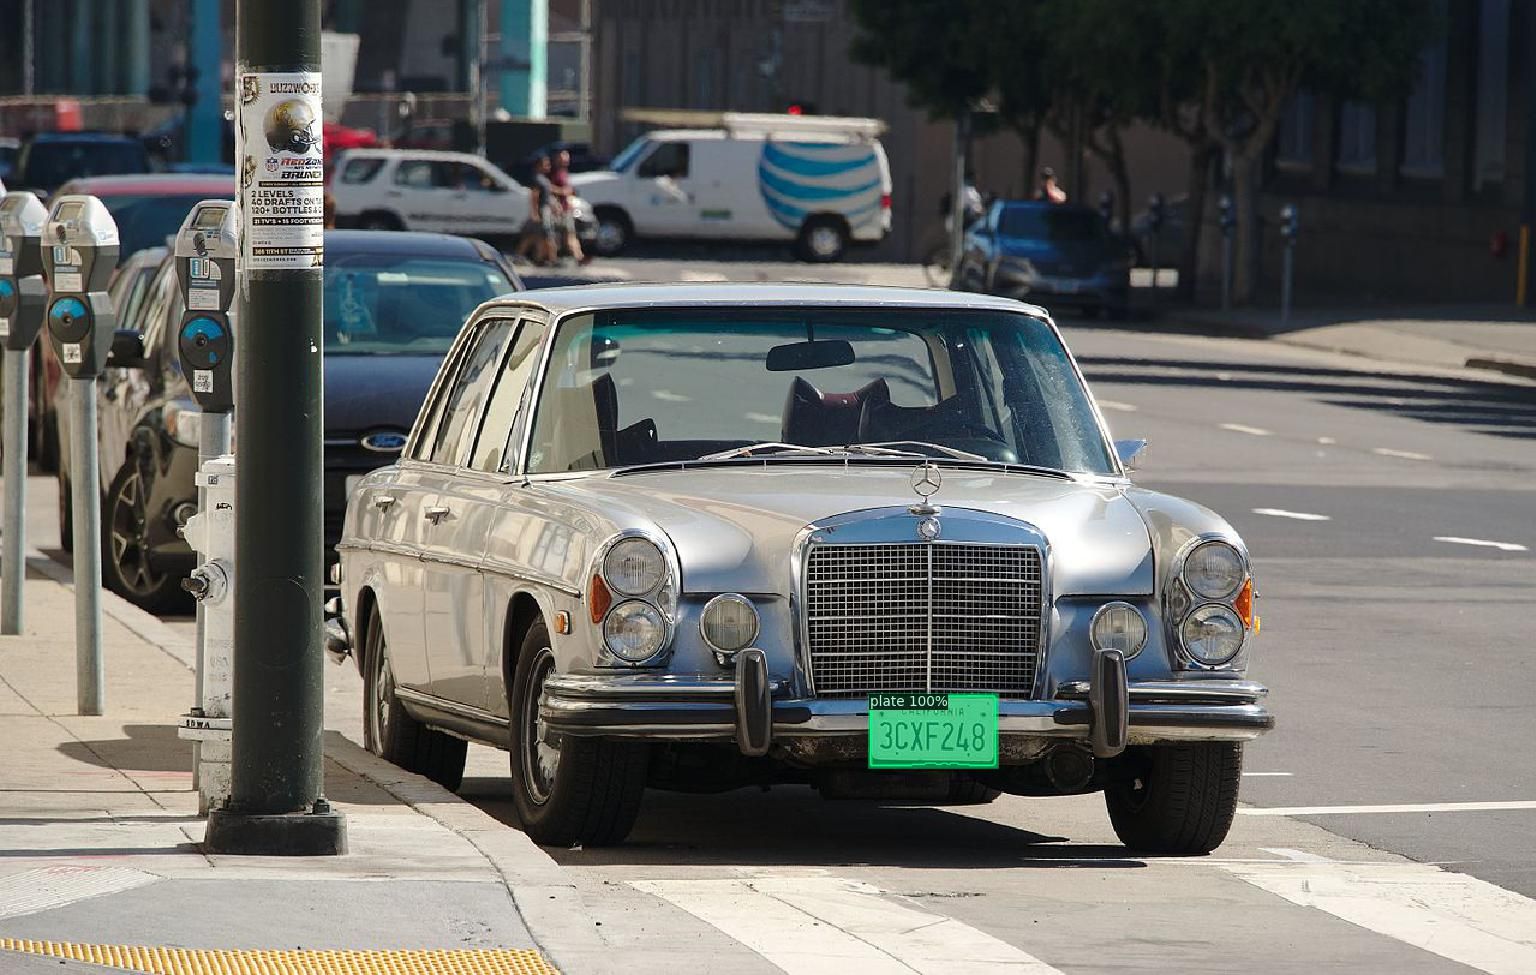
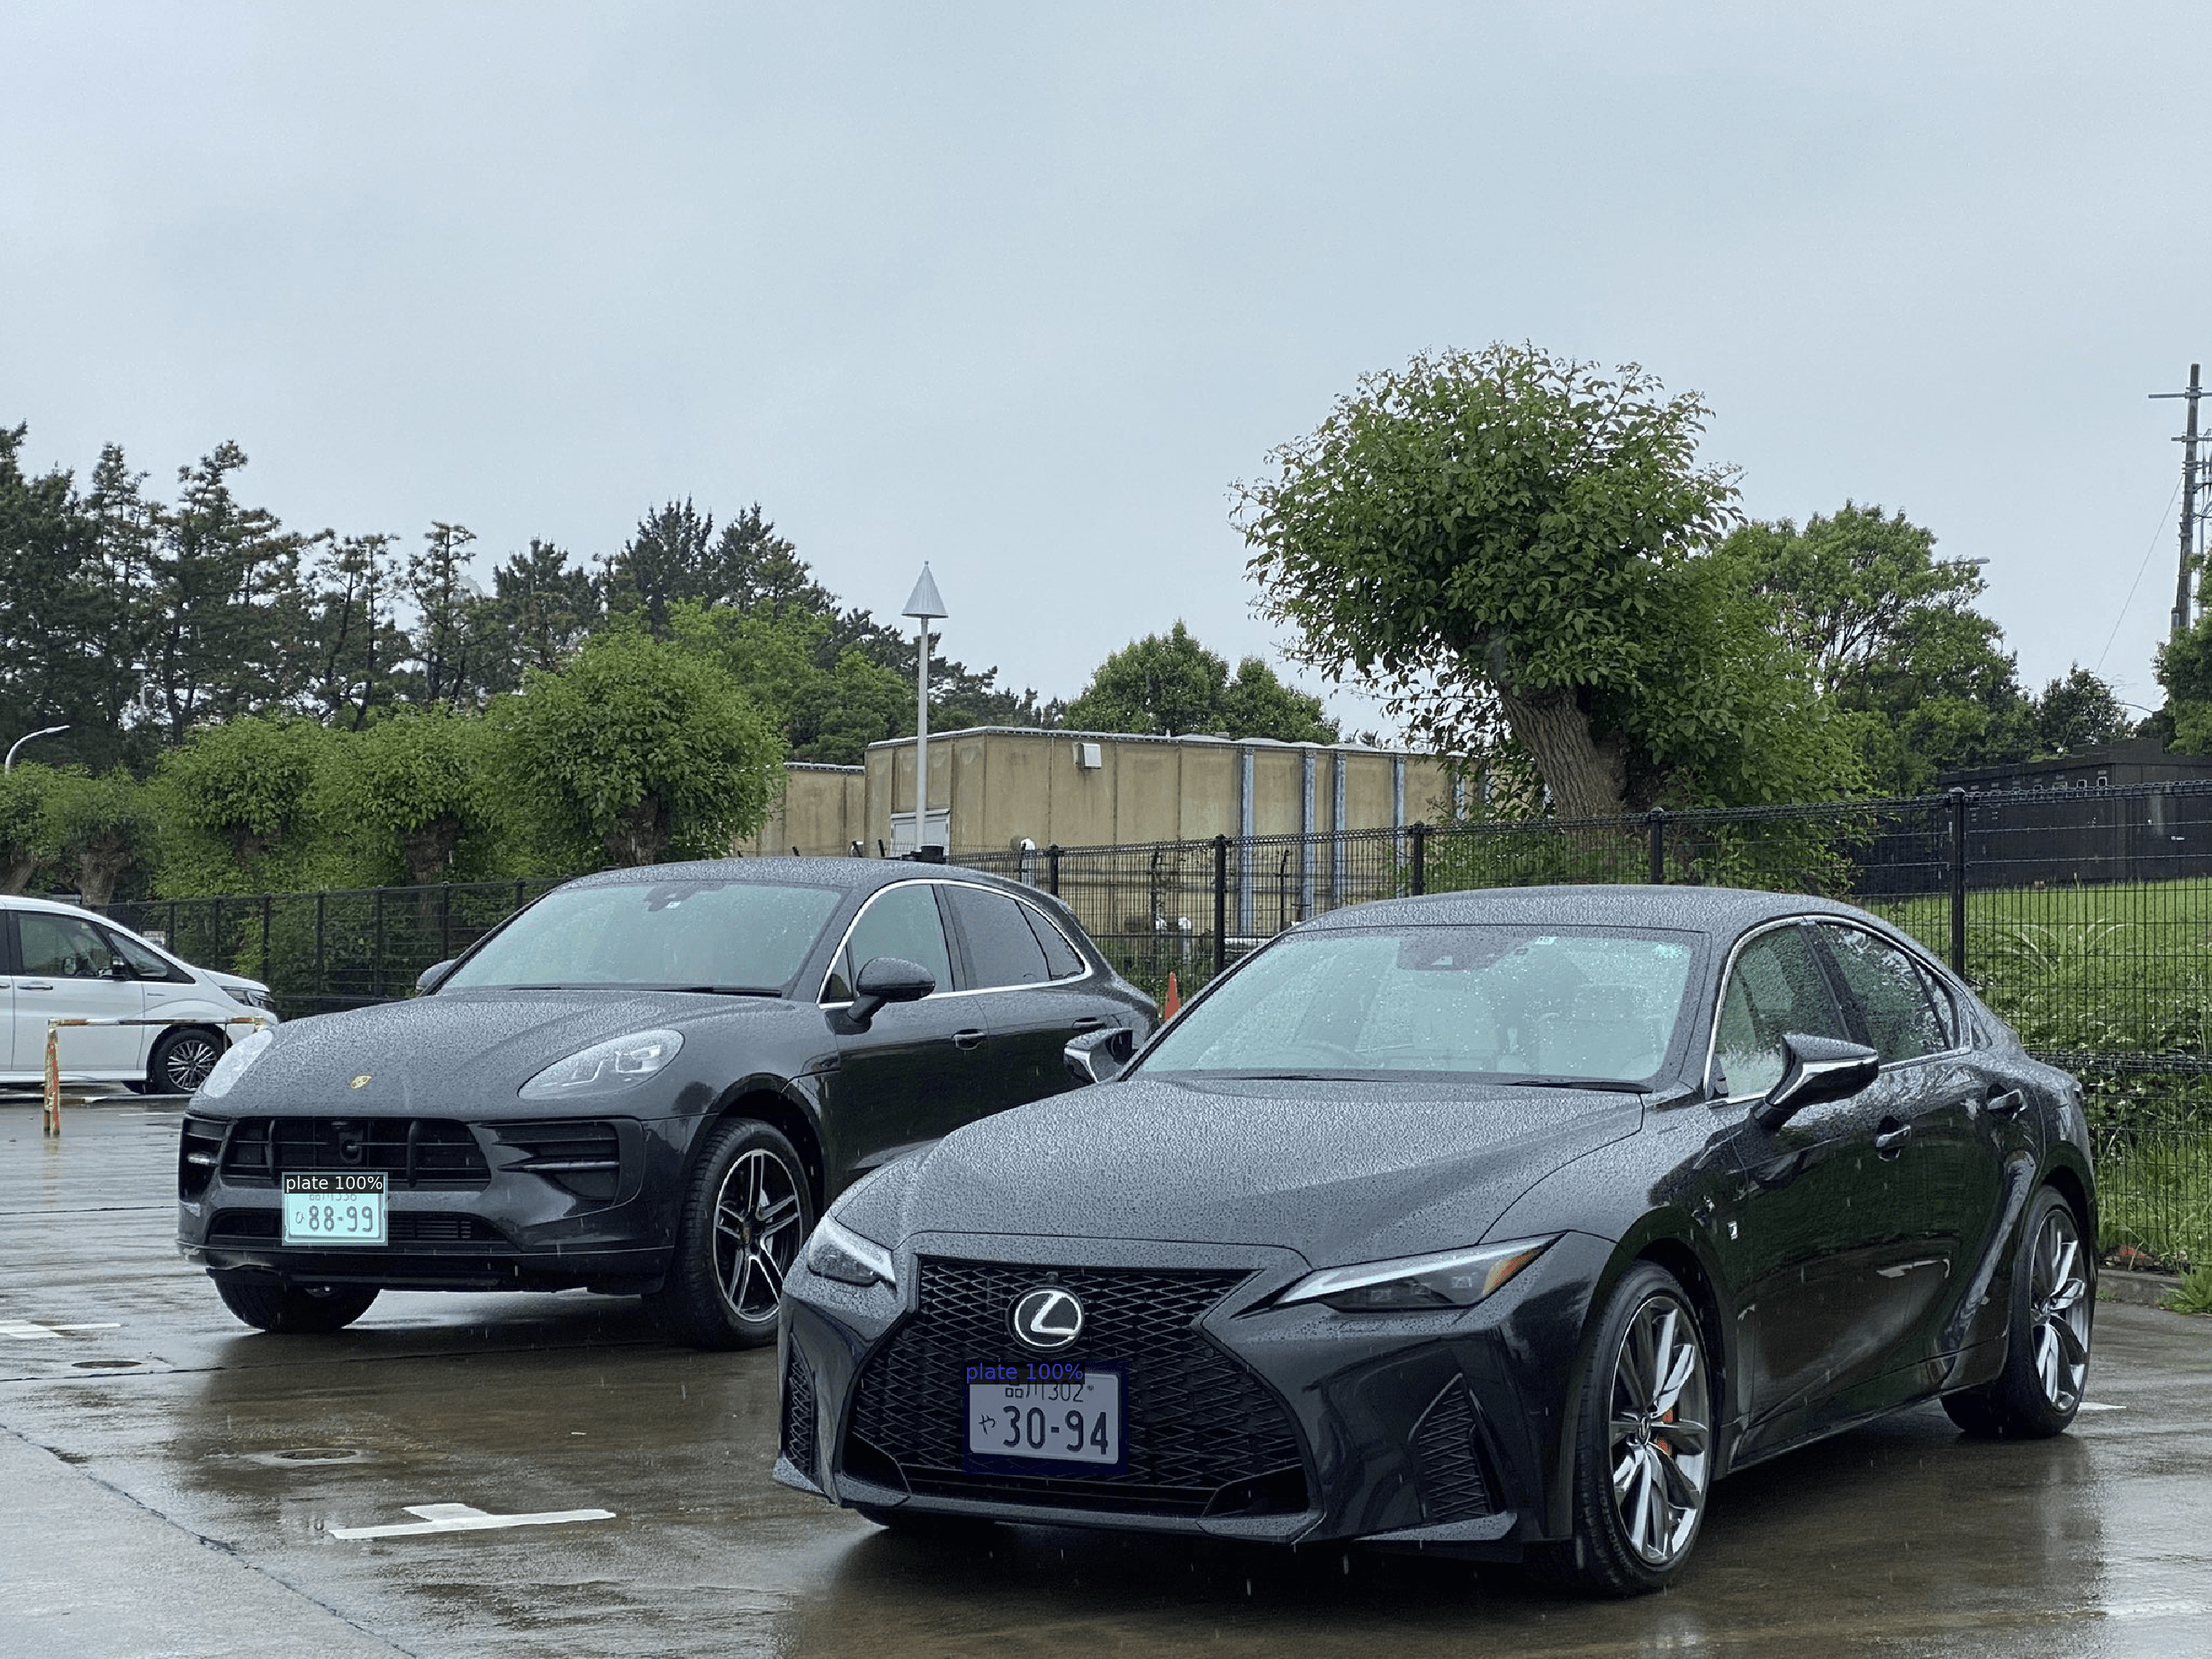

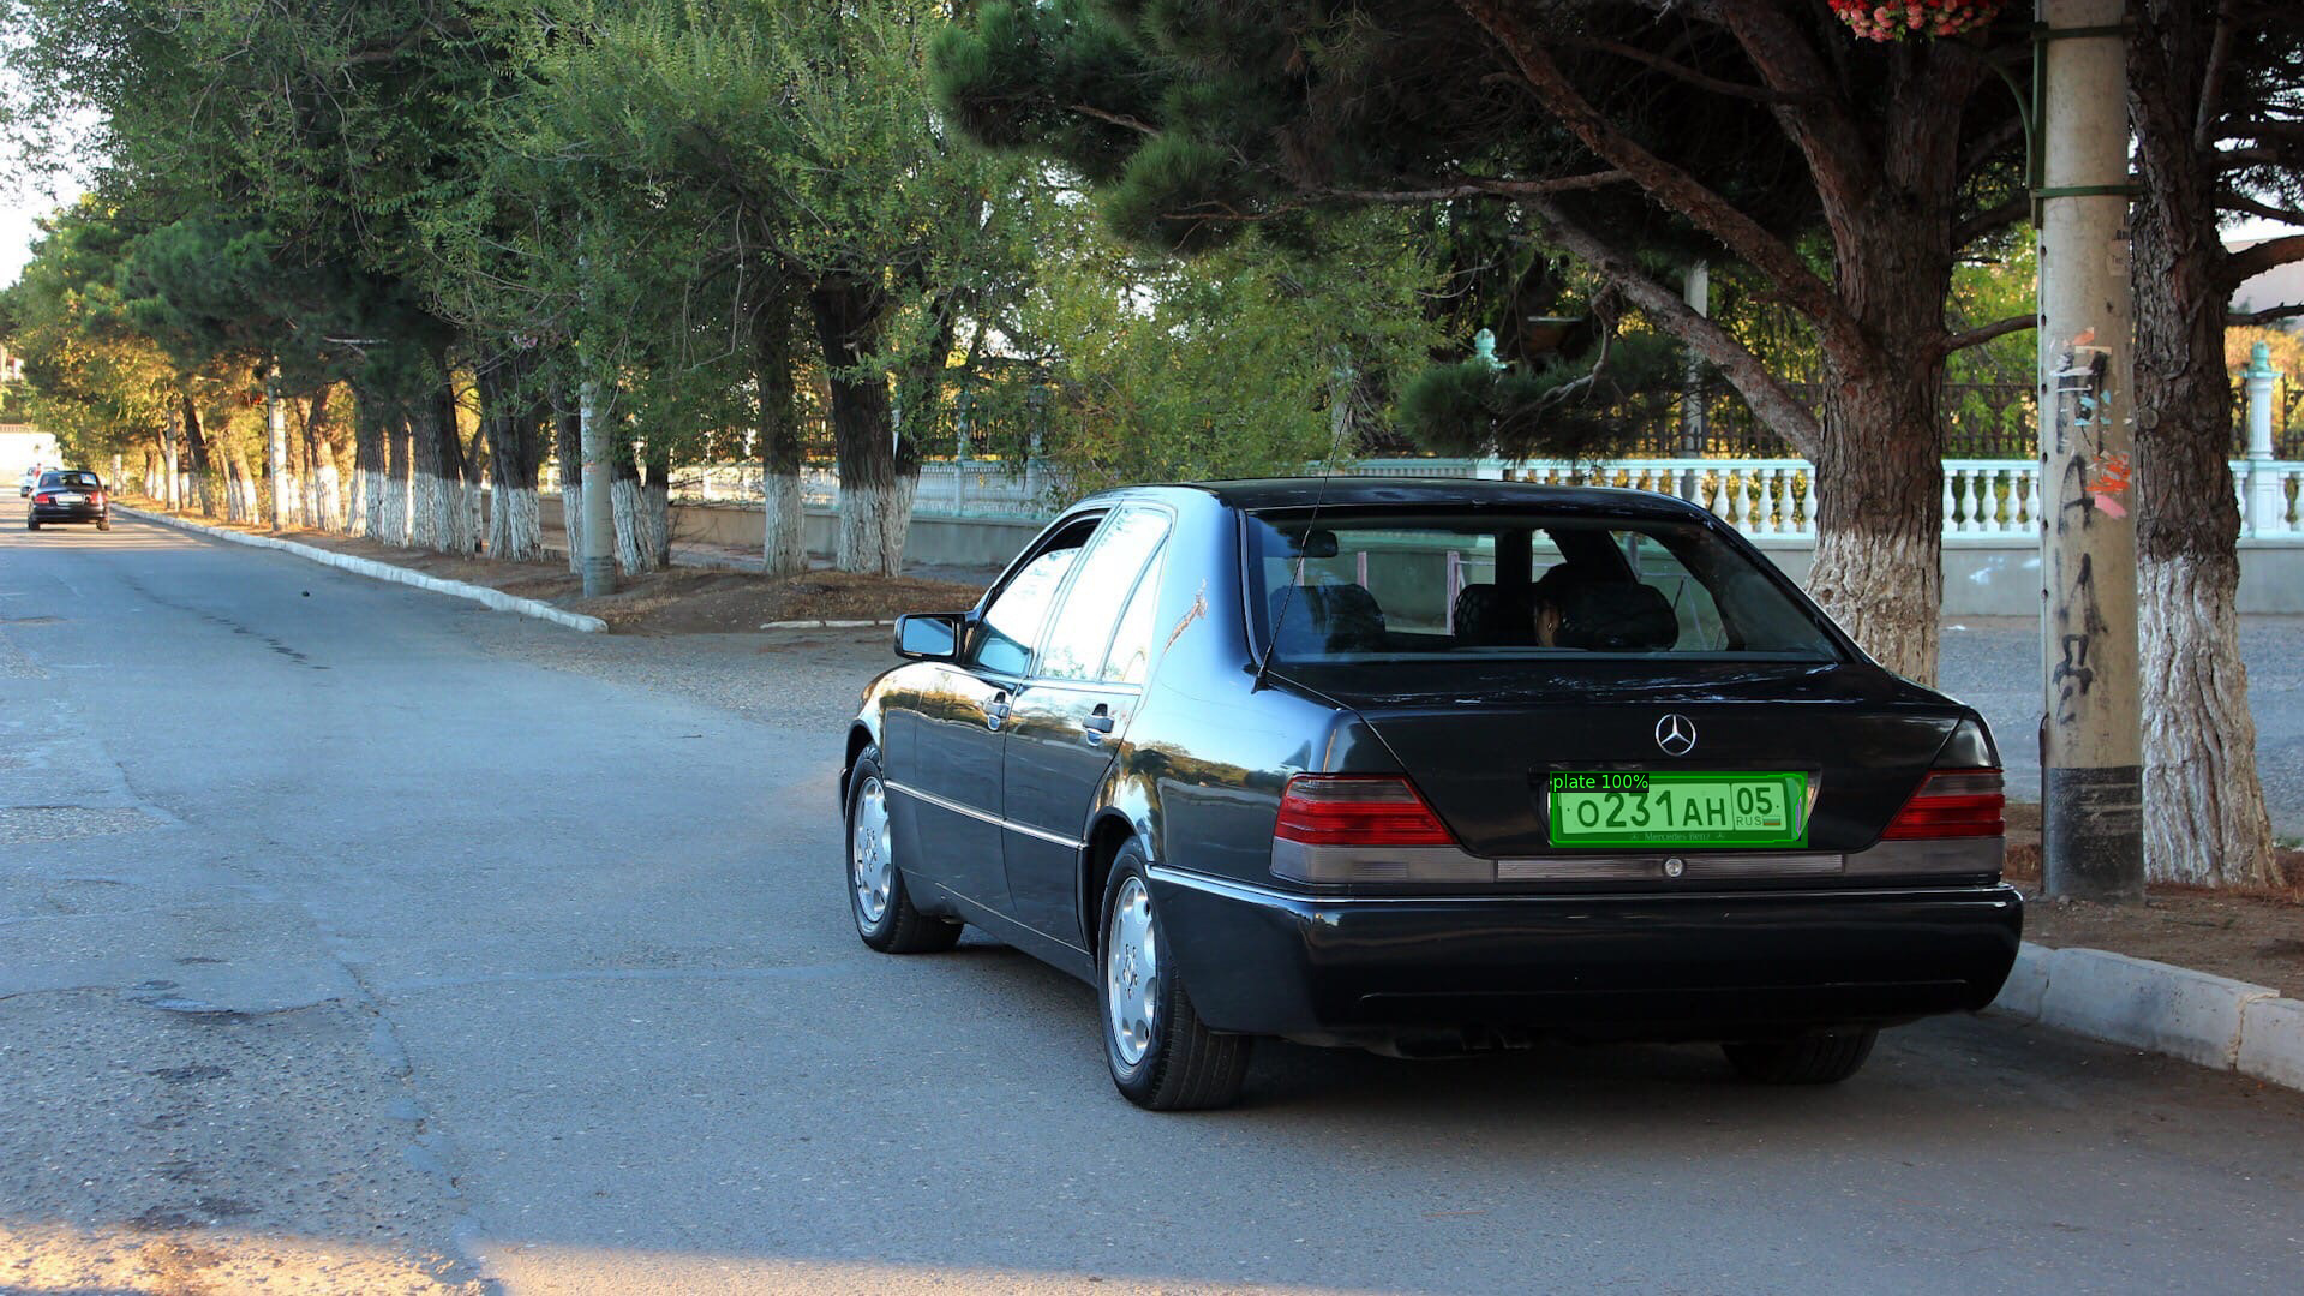
That’s it for now, I hope this tutorial will help you in building your object detection models, or that it at least cleared up some confusion about jumping into this area of ML problems.
GitHub repo with source code for this tutorial
In case you’d like to check my other work or contact me:
